


"Plane of Control": The yellow line represents what Coach Ramey calls the "Plane of Control." This rider's inside elbow is too high and the outside is too low. This limits his low-effort range of motion.
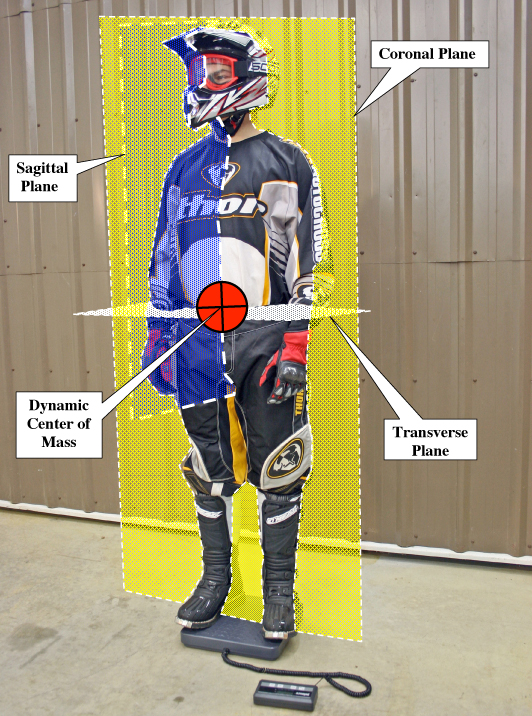
Image: Coach Ramey Stroud
Body Position Tips to Make You a Better Rider
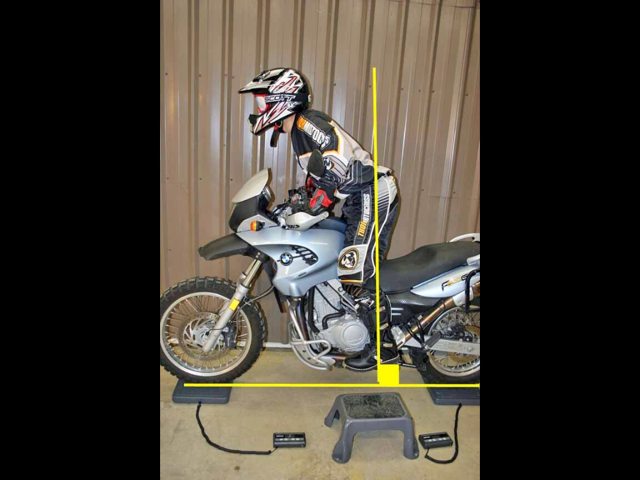
For a slow-speed counter-balance turn the rider's body should be gravity-neutral over the OUTSIDE foot-peg (the red line). Here the rider is doing a good job below the waist-- but his upper body is leaning IN to the turn (the yellow line).
Image: Coach Ramey Stroud
Learn how your body position on a motorcycle affects everything you do. Knowing why, how and where to move your body could be the difference that will see you through. Learn proper arm and hand positioning.
Coach Ramey Stroud operates a world class motorcycle training centre from his 60 acre ranch in Oregon. He's a former desert racer, rally and enduro rider, has completed several IronButt events. He works with professional racers and endurance riders, as well as adventure riders.
Website: http://RideCoach.com
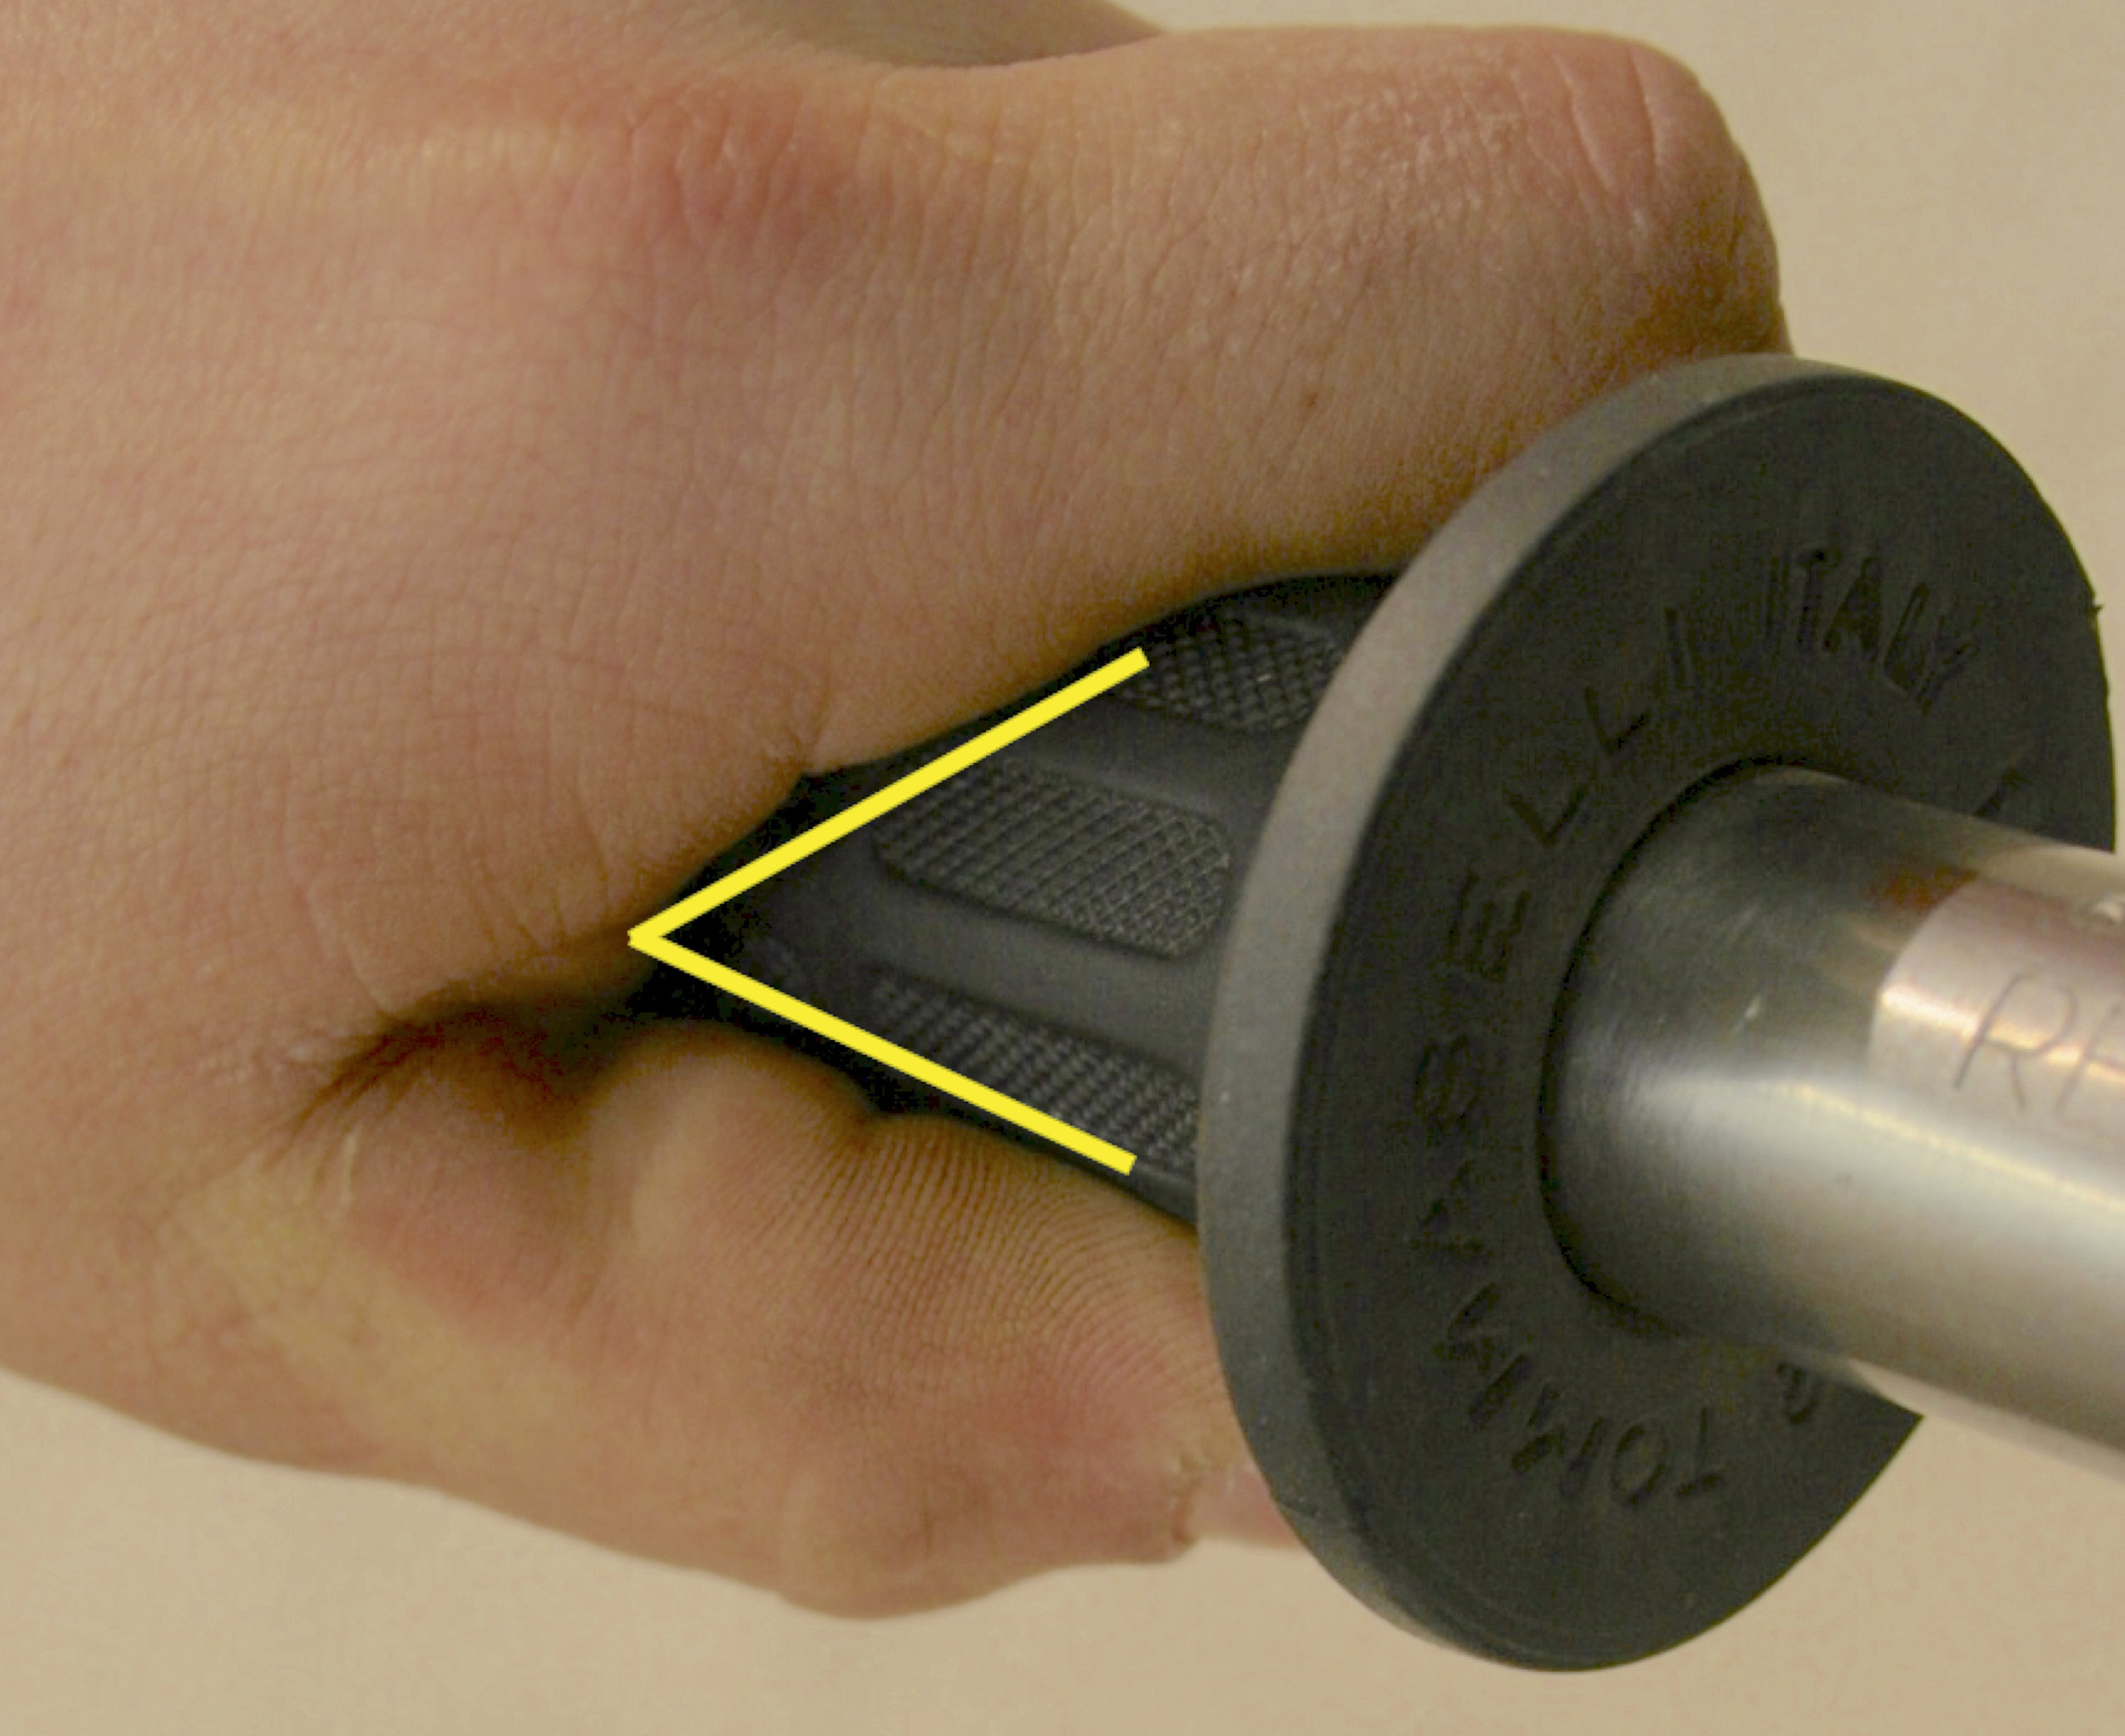
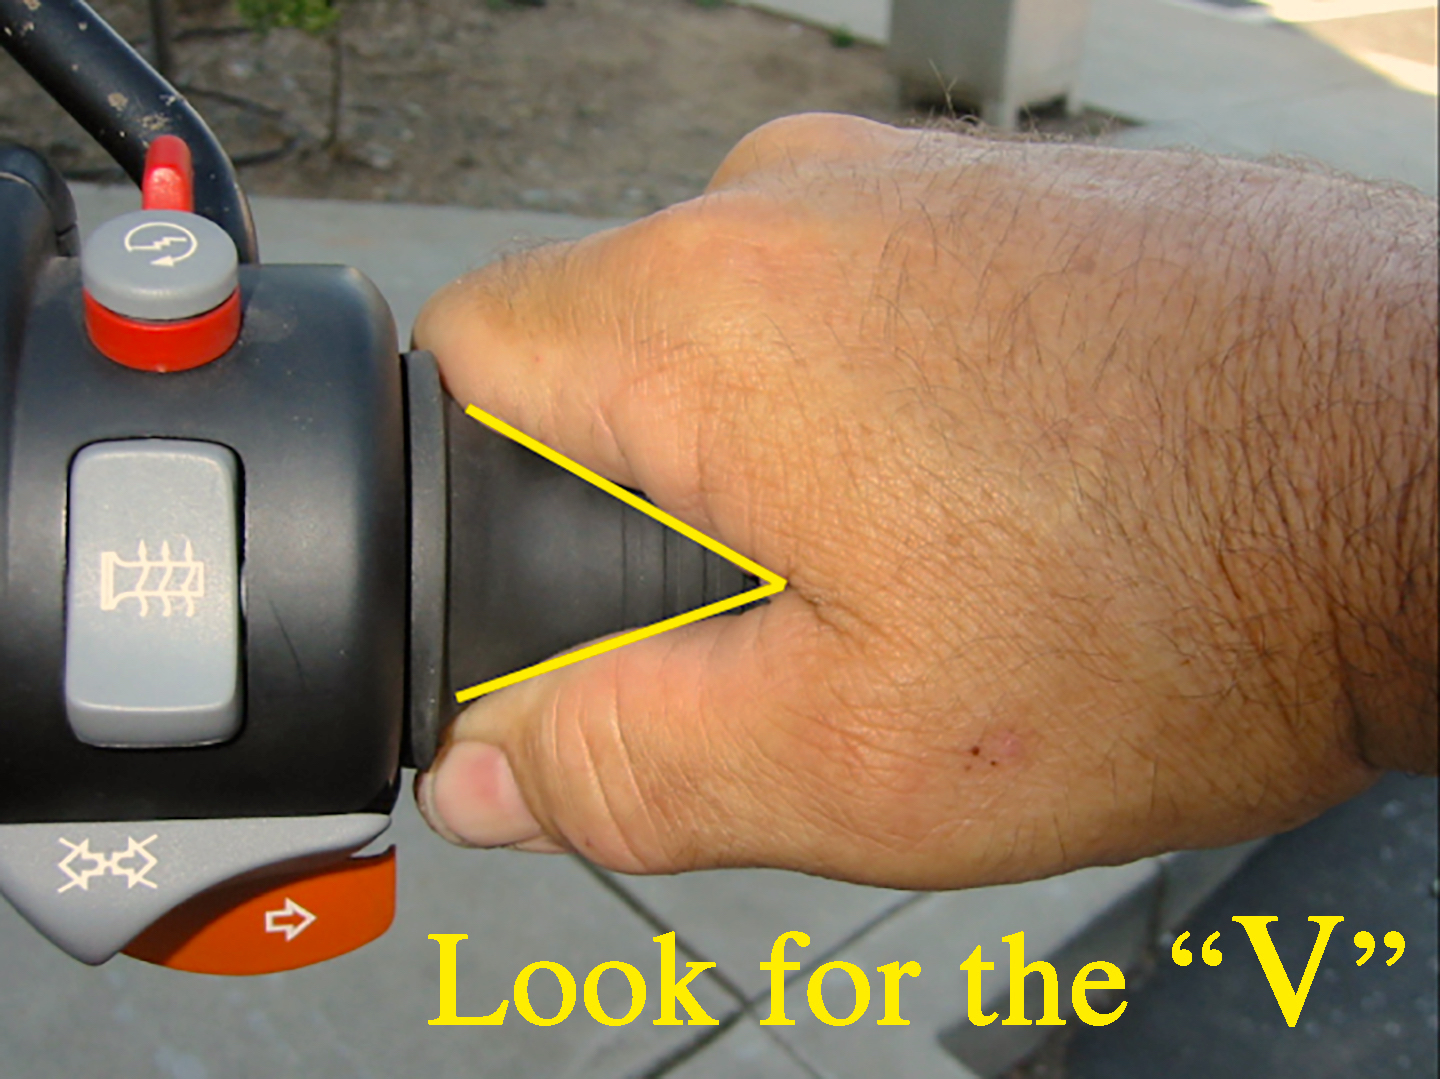
Look for the V” between your thumb and the pointer finger. Try it— with your hand lightly over the grip, raise your elbow and point your fingers to the headlight.
Lightly drop your hand down to the throttle and then rotate it like a screwdriver. Notice your wrist stays in-line with your arm so no wrist nerves get pinched when you roll-on the gas.
DISCLAIMER: This segment is not intended as a substitute for taking a rider training course. We recommend that you work with a professional trainer before trying any of the techniques discussed, or do so at your own risk. Canoe West Media, Adventure Rider Radio and Coach Ramey Stroud do not assume any responsibilities for injury and damages, including and not limited to, yourself, another person, motorcycle, etc.
TRANSCRIPT:
Interviewer: Jim Martin | Guest: Coach Ramey Stroud
This transcript has been created from the original audio episode released March 8, 2018. This transcript may have been modified to make reading easier. As Adventure Rider Radio shows are meant to be listened to and not read, the following script may contain some grammatical and other errors. You can also listen to this interview by downloading the episode.
PROLOGUE:
Jim (Narrate): Have you heard people say before to keep your elbows up when riding off-road and wondered, why? Or maybe why your neck gets sore when you ride? Or possibly, you injured your back because you hit a deep pot hole, and you thought, how did that happen? Why does it happen to me? Well today, on our exclusive rider skills segment, we have Coach Ramey Stroud. He’s going to explain why and how to achieve the perfect body position for you on your bike. He’s going to give you some techniques that should have you riding better, longer, and more relaxed than ever before. And for much of these exercises, you can do them sitting in your chair, or anywhere for that matter (eg. while you’re sitting at your computer at work). Today, helping bring out the best rider in you: Rider Skills. My name’s Jim Martin, this is Adventure Rider Radio. Stay with us. We’ve got a good one for you.
PROLOGUE (Con’t):
Jim (Narrate): Today, for our exclusive Rider Skill Segment, we have with us Couch Ramey Stroud. You may remember; we did a story a while back on Couch Ramey. He’s a dedicated racer, a life-long motorcyclist, and at age 53 he won the Best in the Desert Off-road Racing Championship (among other podium finishes). He’s still racing. Coach Ramey now trains racers to win, as well as non-competitive riders to improve their skills. And most of the training that he does, he does from his 60 acre ranch in Oregon.
INTERVIEW
Jim: Ramey, welcome back to Adventure Rider Radio.
Coach Ramey Stroud: Hi Jim. It’s great to be back.
Jim: What are we going to talk about today?
Coach: Well, we are going to talk about using our bodies much more efficiently to be able to control the motorcycle. The goal will be to improve control performance with less effort. That’s going to allow to do more things on the bike, and last longer, in the sense of not getting tired so quick.
Jim: For adventure riders, it can make the difference of ending your day still feeling like you have loads of energy and you’ve had a great time, or feeling like you’re completely thrashed and ready to hit the bed.
Coach: Absolutely. Especially if you’re on a multi-day trip. So you wake up the next morning, and you’re still tired, and you know you’ve got 4/5/6/7 days ahead of you, or weeks ahead of you, or months ahead of you. So the idea is that every time I get out of bed, I’m going to be smiling and looking forward to that day’s ride.
Jim: Most of us don’t realize that motorcycles can be set up for you, and should be set up for you. Those adjustments should be made with the mechanical parts of your bike. But today, we’re focusing on the human aspect of it.
Coach: Yeah, the other thing is, not only your physiology, but how you ride the bike. So in other words, if you’re a street rider and mostly in a seated riding position, that’s going to be one set of ergonomics. If you’re a dual-sport rider, where you’re seated and standing, going back and forth, that’s a different set of ergonomics. Or if you’re a hardcore off-roader, you’re going to be standing up most of the time, then we set the bike up a little differently for that, too. So, how you ride is just as important as what your body looks like, and how you use it.
Jim: I don’t want to go down a rabbit hole here, but I can’t help but ask you this question at this point- because it comes up a lot when we talking about setting up your bike- if you are a dual-sport rider, and you ride a lot of dirt, and you ride a lot of street, what do you set your bike up for? For street? Or for your dirt riding position?
Coach: Good question. Actually, there’s two options. If you’re the kind of person that just wants to get on the bike and ride all day, and never touch it, then we try to split the baby. That the level and handle bars and ollie ergonomics are not going to be set up perfectly for seated, or for standing, but somewhere in between. But the reality is, on a lot of bikes, it’s not that tough to change things around. So let’s say you’re going to take off for the weekend. You’ve got all your gear on the back, you ride the highway to wherever you’re going. [Then you] get all your gear off and set up your camp, and then grab your tool kit and make a few little adjustments. Then do your off-road stuff. And then you’ve got a bike that’s not only going to fit your body, but we’re also going to make a few little suspension changes so that the bike’s going to handle better off-road. Then when it’s time to pick up the camp and go home, you change it all back and take off. So you’ve got two options.
Jim: Okay. So we’re starting at our foot pegs, and we’re moving up. Why are doing that?
Coach: Well, the thing that is very, very, very common is that, most people visualize their primary connection with the motorcycle as their shoulders and hands. They’re hanging on to their bike. So what we try to do is get them to change that picture, and start to visualize their primary connection with the motorcycle from the waist down. As we get into it, you’ll start to understand why that is. But the idea of building the different riding positions from the foot pegs up is to emphasize that lower body connection. In road racing we clip that on it’s head and we start building the postures from the eyes down. But for off-road/dual-sport/adventure riding/rally/that sort of thing, it’s from the foot pegs up.
Jim: Where should your foot be, to begin with, on the peg? The balls of your feet, and the arch- what’s the difference, and why should we choose one over the other?
Coach: Well, the thing about your feet, and your boots, is that they’re highly mobile on a foot peg. They’re moving all over the place. In other words, if we need to shift gears or use the rear brake, we’re moving the foot forward. The foot peg is normally just in front of the heel in the arch of the foot. That way you can push down or pull up. It’s called dorsiflex or plantar flex. The problem is that in a motocross boot, the foot’s kind of locked into the boot. In other words, to shift or break you really can’t flex your toes up or down, so you end up moving your whole boot which moves your knee forward, which brings your hip around. There’s a lot of movement in the lower body just to shift gears or to step on a brake. If you look at a lot of the new motocross boots or off-road boots, you start to see that there is a hinge point at the ankle. [This is] because manufacturers have finally figured out that we need to be able to dorsiflex plantar flex. To be able to use the leverage effectively, and more importantly, to engage some of the muscles between the ankle and the knee. But let me keep going on this foot peg placement. A lot of times you’re not using your levers. So we bring the boot back onto the ball of the foot, and that way you can raise and lower your heel below or above the foot peg. The reason that’s important is because there’s some really good muscles between your ankle and your knee, and the back part of the leg is something called your gastrocnemius or gastrocs. Then inside the gastrocs is a muscle called the soleus. Those are really two great shock absorbers. But if you can’t move your toes up and down, and your lower leg’s locked into the foot peg, you basically don’t get to use those muscles. One other thing that’s important is, there’s times where we rotate the foot on the foot peg. In other words, the toe will come into the case and the heel will go out. When we get into turns we’ll be talking about that a lot more. But the foot peg is your really critical base of operations. So you just need a stable peg that’s as big as you can possibly get. The larger foot peg of course reduces the pounds per square inch pressure on the bottom of the boot. Boot selection and boot placement is pretty critical.
Jim: So the mechanics of the foot- you mentioned that by standing properly, by supporting our weight properly, we have the suspension in our ankle that we would otherwise omit if we don’t have our foot in the proper position. But there are times when we move it around from one position to the other.
Coach: Yes, constantly. Your foot is very mobile on the foot peg. Part of static training is to know where your boot is and what it’s doing without looking down. And you watch riders out on the training range- they’re constantly looking down at their feet to see where their boots are. Now part of that is because your foot is incapsulated in this big heavy hunk of leather. But the reality is that there is something called pro perception (that’s knowing where your body is in space). And that’s part of training. You need to know exactly what your boots doing, where your foot is, without looking down. And that’s part of the training.
Jim: So moving up, where do we go for the next step?
Coach: Well, if you look at a lot of the race bikes, you see that just above the foot pegs are the engine cases. Those engine cases are scuffed and polished. The reason they are is because the racers will be squeezing into the engine with the insides of their boots at the ankle. A lot of times there’s what we call squeeze plates that are put onto the frame to create a flat surface for the lower leg to be able to squeeze into the bike/clamp onto it. I notice with a lot of the adventure bikes that there’s not really a lot of contact between the boot and the bike. There’s daylight in there. And if there was contact, a lot of times the surfaces are not very smooth. There’s frame members or master cylinders for the rear brake. Something’s going on. One of the things we do to set up is to see what we can do to make the bike more user friendly for that lower leg contact. Another thing I’d point out is that, when you look at a real good pair of off-road boots, you notice that the inside of the boot has rough out leather on it. The reason for that is the manufacturers know that the inside of the boot is part of the squeeze or connection to the motorcycle, and that rough out leather gives you a good contact without slipping. This idea of lower body connection; we start thinking about that from the boots and the inner leg.
Jim: Kind of ironic that an adventure bike doesn’t have contact plates sort of built into it. You think it’d be a big part of the manufacturing process because we look these bikes as sort of performance bikes- these bikes that will perform on the street and will perform off-road- and yet that seems like that’s kind of a vital thing, since we use our legs so much for bracing.
Coach: You’d think so. But I guess when you start looking at bikes, we kind of give them a percentage value of on-road/off-road. Like some bikes are 80/20. 80 percent road bikes, 20 percent off-road. Some are 50/50 and so on. When you get to the bikes that are more off-road than on, then you start to see some these lower leg connections that become a little more user friendly. But if you’ve got a bike that you want to take off-road, it’s up to you to figure out; how am I going to make this thing more user friendly for me? How am I going to get better leg contact, lower leg contact, between my motorcycle and myself?
Jim: Before we go on though- what sort of things/what sort of solutions have you found for bikes that don’t have contact points where they should have on our lower leg? What can you change?
Coach: Well, there are some after market parts that you can put on some bikes. Sometimes you have to adapt them- (eg.) where maybe there’s a rough surface under the leg with a frame or engine bits or air box, something like that, where you can put some squeeze plates on there and attach them at different points.
Jim: So after our lower leg, as we move up, we’re looking at our knees?
Coach: Yes sir. Now, depending on who you are training with, you’re going to hear a lot of different opinions about where the knees need to be. But most of the time you need to think about my knee touching my bike. When I am seated, my knees going to be in a different place than when I’m standing. So as you go from a seated to standing position, or standing to seated, your knee is going to drag forward and back as well as up and down. Where it drags across the bike, sometimes we’ll make special pads that go in front of the seat, and either velcro to the tank or glue to the tank. We’ll make that slide area for the knee that goes up and down to be smooth and easy to use.
Jim: Okay. So from the knee we’re moving up. I assume it’s going to be our hips that we’re looking at next?
Coach: Well, yeah. The hips are a pretty complicated structure. So if we’re in a seated riding position, a lot of times you’ll see slouching. So the pelvis (which is another way of describing the hips) will be rotated forward or backwards. A lot of times, the pelvis is rotated backwards. So they’re sitting on the gluteus muscles, glutes, and they don’t really feel the seat very much through that muscle mass. So a lot of times we’ll have to teach them how to rotate their hip forward up on to what are called the ischial tuberosity (the I.T.’s), which are the seat bones in the bottom of the pelvis.
Jim: Even just a minute ago you were mentioning about the boots and about how often we don’t think about the connection between everything. If you have a stiff boot on, and you have to tilt your leg to get underneath that shifter lever, then you’ve moved your knee forward which is moving your hip forward, which is now twisting you in the seat and transferring weight on the motorcycle.
Coach: Yup. And all of these things cause the bike to do something. Most of the time…let’s say we’re on the left side, on the gear shift side. You’ve got to turn your toe out, and bend your knee, and move your hip. That means that you’re shifting a lot of weight to the left side of the body. So as you shift in gears, you are cranking in a little turn to the left, and you’ve got to compensate through the handle bars. These are all the things that go along with body mechanics. How can I operate the controls of the motorcycle and still be able to go straight? Or continue the turn (if thats what I’m trying to do)? These are small things that most of us don’t think about. But the reality is that we can fix them pretty easily, making riding the motorcycle so much more easy. Energy expenditure is a big part of body mechanics. Especially if you think about [how] some of us are getting older, and we don’t want to work quite as hard. So if I can make the ride easier, if you can put in eight hours on the bike and still get off smiling through body mechanics and some training, then all of a sudden I’ve extended your riding life. You’re not going to quit until somebody drags you off the bike. And that’s what we’re talking about today- making it easier to ride your bike.
Jim: You also mentioned in there a little bit about the seat, and I know that you’ve talked before about the different seats. Well I mean, let’s face it, if you see a dirt bike, it’s got a narrow flat seat so you can move around. And then a lot of our other bikes, adventure bikes that are made for more touring than straight dirt, have seats that sort of want to hold you in a position.
Coach: Yeah, I recall those are the tractor seat. It goes right back to: What are you doing with your bike? What kind of riding do you do? And you build a seat for the bike, and of course for your body, but also how you’re going to use it. So if you’re the kind of person that gets on a bike and loads up all the gear, and you’re on the highway going straight for most of the time, then those tractor seats are great. On the other hand, if you’re the kind of person who gets off-road, and you’re going to be going through the forests or around the tumbleweeds and you have to get in and out of the rocks and over ruts, that seat locks you into a seated position that you’re going to have a hard time dealing with. So it may be there that the seat forces you to stand up more than you would otherwise. It’s a variable that you need to think about, and make some decisions before you get the seat changed. One other thing that’s really important (and you mentioned the off-road seats) is, most of the time on street bikes, we’re concerned about going left and right. Off to the side of the bike. But when we do off-road, we really need to think about left and right and forward and back. When we get into body positions, we’re going to talk about moving back on the motorcycle. So if you’re down in one of those tractor seats, or there’s a big lip between the front seat and the passenger seat, you’re not going to be able to get back into a braking position as easily as another seat might allow you to do. So how you ride is an important part about picking a seat.
Jim: So the hip angle that we happen to sit at, or at least working ourselves to get our hips straight, that’s going to control how our weight sits on the bike- I guess through our butts. Moving up from there- we’re talking about the curve of our back?
Coach: Yeah, that’s another part of posture. Remember I was talking about how some folks tend to slouch? Part of that is that sometimes our core muscles in our abdominal area don’t get a lot of exercise, and so they tend to become a little bit weak. One of the things we try to do is remind folks where muscles are, and how to maintain just a little bit of tension to keep your core strong, and your back flat. For example, as you’re sitting there in the chair, visualize somebody grabbing you by the hair on the of your head, and lifting you straight up. You get a little bit tall. Well, muscles only pull, they don’t push. And there’s no muscles above you, so there’s nothing pulling you up there- how did you get taller? The answer is that the way you got taller was when you visualize somebody lifting up by your hair, you recruited two muscles in your core called the iliopsoas, and they rotated your pelvis forward. And their spinal cord was pushed up from the bottom, because it’s on top of your pelvis. Those two muscles are absolutely critical to anybody that rides a motorcycle- seated or standing. Those two muscles, the psoas muscles, are the only muscles in your body that attach in three places. When you recruit them, through little tricks like somebody pulling your hair straight up, then you’re making your those muscles shorter. It’s pulling your pelvis forward. It’s giving you some core stability that we try to maintain at all times on the bike. Now, I’m not asking everybody to become extreme athletes. These are just some pretty basic connections between the rider and their body that, if you can make the connection, then all of a sudden your riding is going to get a lot easier. And, your control function will become much more effective. Because, if you can maintain that core stability, then all of a sudden you can lean forward, left, right, [and] you can move your hands on levers without having to hang on to the bars. There’s just so much you can do with that core stability. The other thing is that, when you recruit those two muscles, if your back is rounded or hollowed, it tends to get a little flatter. Then your’e able to absorb energy that hits, bump energy, a little more effectively before it gets to your head and your brain.
Jim (Narrate): Well, we’re going to be right back with more in just a minute from Coach Ramey. A lot more- including what I think is really important is- where you’re supposed to have your elbows, and why you have them there. That’s coming up, so stay with us.
BREAK
INTERVIEW (Con’t)
Jim: You said about having our backs straight basically. And, being able to absorb energy. It sort of makes you think that if you were slightly rounded forward, that you would be able to absorb more energy before it’s transferred up your spine [and] into your head.
Coach: I think that one of the things that happens is that we forget that our spines have a bunch of curves in them anyway. [So] when we say a straight back, it implies the natural curves of the spine. But when you see somebody that’s slouched over forward, that the back is curved, there’s not a lot of stability in that structure. So when they take a hit, they tend to compress even more. At that point, a lot of us don’t have a lot of range of motion in our spinal vertebrae, and then all of a sudden it hurts. Or, we end up losing range of motion, which prevent us from being able to use our controls effectively. But a flat back really gives you a lot more stability and ability to absorb bump energy.
Jim: And I guess as we go further along here, and talk about our hands, also if you’re leaned forward or crouched forward, you’re putting weight on your hands. Which is what we don’t want.
Coach: Oh, we’re going to get to that.
Jim: Right.
Coach: Big time. Absolutely big time. Okay. So if you were to put your hands out in front of your body, and put them on some imaginary handle bars and just hold them there…how long could you hold your hands up in space? In other words, the handle bar grips are used to hold our arms up. Because sometimes we end up getting tired too fast. One of the reasons that we get tired holding our hands up is because we’re using the front part of the shoulder, the deltoids and the pectoral muscles, and the muscles around the shoulder called the rotator cuff. All those muscles are strong, but they’re not really designed to hold the hands up in front of the body. So one of the tricks that we use is; you sit up straight (don’t sit back on the chair, just sit like you were sitting on a bike) and pinch your shoulders blades together behind just a little bit. Notice that your shoulders come back. The reason for that is there’s some really big muscles in your back, and those big muscles can hold your arms up all day long (using sort of a a candelabra design, but). The reality is most of us don’t engage those muscles for our arms. We’re using the front muscles and we’re using the handle bar gaps to hold our hands up. So if you all put your arms up and just pinch your shoulder blades together a little bit, you’ll feel the pressure go from in front of the arm just under the armpit, to the back of the arm just under the armpit. As you retract by pinching your shoulder blades together, you can move that pressure. Now that problem is, once you engage the broad muscles of the back, your hands come back away from the handle bars. Now you can’t reach the grips. This is what screws everybody up. They say, that’s really good, but now I can’t reach the bars, so I have to reach out forward and round my shoulders again. By the way- the rounded shoulders in front, we call it a closed chest. When your shoulders are back, and you’re using the broad muscles of your back, we call that an open chest. Anyway, back to reaching the handle bars. So instead of rounding your chest and closing it to reach the bars, sit up tall, bring your shoulders back, now fold forward a little bit toward your bars. And then your hands are resting on the grips very lightly, and you’ve got very, very precise finger contact for control function. Clutch, throttle, brake and steering.
Jim: When you say ‘fold forward’, how do you mean that?
Coach: Well, fold is kind of a weird word, isn’t it? In other words, I could say very easily ‘lean’. But the reality is that you’ve been training to fold all your life. Every single time you get up out of a chair- what do you have to do before you go vertical? Fold forward. Anyways, we just use the [word] fold just to keep reminding you of this picture of going forward to the bars. But you notice that when you do get out of a chair, you’re not pulling yourself up out of the chair with handle bars. Yet, when you see most riders go from a seating to a standing position, just look at all the arm strength their using to pull themselves up. So when you get out of the chair, you fold forward, bring your mass over your new base (from your butt to your feet), and then you go vertical. That’s exactly what we do on the bike when we go from a seated to a standing position. We also use that same exact fold with an open chest to be able to come forward to the bars. It gives more of an athletic position on the bike so that we are able to engage ourselves more athletically. When you get it, it’s a really good feeling.
Jim: So when we’re sitting in that position, what do is; first we’ve got our hips vertical, we’ve got our spine basically flat (well, theoretically flat), now we’re pulling our shoulders back to create an open chest, but now we’re leaning or folding forward. So in essence then, our spine or our flat back is now slightly toward the front of the bike.
Coach: Well, you can be tall, and flat, and fold. In other words, as you fold forward, just continue to be tall. Just continue to think somebody’s lifting me up by the hair on the top of my head. Now some of you bald guys are going to have to really visualize this. But you can do it. So you’re sitting tall, and as you fold forward, you stay tall. The way you do that is you keep those iliopsoras muscles in your core engaged. Now, once you learn where those two muscles are, and you learn to keep a little light tension there, then you’re going to become much more efficient on your bike.
Jim: So what you’re talking about is tilting the hips forward.
Coach: Yes- you’re folding at the hips with a flat back above them, coming forward to the bars. The reality is you’re not going that far. When you open your chest, your hands came back what…four inches? Maybe six? So you’re still basically in a nice seated position, you’re just a little bit more forward from the waist up. So we’ve worked our way up with a flat back, and now we’ve talked about our shoulders, so let’s talk about from our shoulders to our fingertips. I use a phrase called ‘plane of control’. If you thin about ‘plane’ in the sense of a flat surface, I want a flat line from your shoulder to your elbow to your wrist to your fingers. A lot of people are not used to raising their elbows on the bike. That your arms hang down. You’ve got your shoulders up above, you’ve got your hands on your grips, and your arms just hang there. If you’re just going down the highway straight, and it’s just a very relaxed position, and you’re not doing much, there’s absolutely no problem with relaxing and letting your arms hang down. Just like you normally do. But if you’re in an off-road situation where you need to up your control on your motorcycle and be much more reactive, then you’re got to get into a more athletic stance. The other thing is that we can then control the bike much more efficiently with our elbows up. We’re going to explain why here in a minute. So if we think about this range of options, I can sit relaxed with my elbows hanging down. But if I get in a situation where I need to be more aggressive, I need to get my elbows up on the ‘plane of control’ as fast as I possibly can. That’s the picture in your mind, now we’re going to go to why. Okay so, let’s use an example. I think most everybody has probably either been to a motocross course, or seen pictures of it, where they have this section called the whoops. A lot of times they’re rollers where the bike is going up and down, and up and down, and up and down. And the really fast guys- they’re not doing that. They’re skimming across the top. Well, let’s assume you’re on an adventure bike. You’re not going to skim, you’re just going to roll up and down and up and down. Well, if you look at some of the videos (let’s say from the GS Giants, or the BMW MOA or some of these rallies), you’ll see that the arm length between the rider and the handle bars never changes as they go through the rollers. So then if the bike pitches up on a roller, the rider is thrown back. Then the bike comes up over the top of the roller and goes down, and the rider is pulled forward. In other words, they’re not using their elbows at all to push the bike down for the downhill, and to pull the bike up for the uphill. They’re not pumping their arms. That’s causing their upper body to get thrown all over the place. Whereas if they’ll either stand or sit in a neutral position, and they’ll pump their arms, then all of a sudden the bike is rotating under them at the foot pegs, and their head is in a straight line smooth all through the rollers. The idea is that our arms often need to be very, very mobile on the bike in an off-road environment. The way that happens is where we get our elbows up on the plane of control, where they can move around easily. When the elbows are down at your side they’re locked in, and your range of motion is reduced dramatically. So get them up there where you can move them around, and use the broad muscles of you back to help hold them up. Okay, so we’ve been to the shoulder, now we’re at the elbow, let’s go to the wrist. I’m going to kind of go away from plane of control for a minute, but I’ll come back, I promise. If you think about how most people turn the throttle on, you see them roll their hand down (especially if they’re going to full throttle), and there is this big giant bend between their hand and their forearm. Sometimes it’s almost like 90 degrees. You whack it wide open. Well, that creates a problem in that there are two major nerves that go through the wrist, through the carpal tunnel, and when you bend your wrist that hard, you pinch those nerves. Even if you’re not going full throttle when you’re going down the highway or going off-road, if you allow that wrist to bend, you’re going to be pinching those nerves to some degree or another. The way it manifests itself is a lot of times your hands will start tingling like they’re going to go to sleep (or they do go to sleep), and then you take a break and you shake it off, and then go back to do it. Well, let’s say you’re on a long trip and you’re going to be on the bike for days. Pretty soon, you can’t shake it off anymore. You wake up at night and your wrist hurts, and your hand hurts. You have to change your hand position on the throttle to not pinch your nerves. ‘Plane of control’ will allow you to do that. Here’s how: (now I’m back to plane of control) so when I reach out to the handle bars by folding forward, if I just set my hand down on top of the grips lightly, they’re generally pointed- my fingers are pointed- straight ahead. But if I raise my elbows, you’ll notice that the fingers start to change and point now to my headlight.
Jim: Because when you raise your elbows, you’re swinging outward, which is all of a sudden making your lower arm angled back in towards the bike.
Coach: You got it. Like this big ‘v’ from your shoulder to your elbow to your fingers. Now when your fingers are pointed towards your headlight and you look down at the grip, there is a ‘v’ between the web of the thumb and the pointer finger. You want that ‘v’ on the grip. Then if you’ll keep one or two fingers out over your levers, and reach down under the grip and put your thumb on your third finger, you now have a really nice hand position on the grip (on both sides, anything we do not he right we do on the left). Now we’re going to twist the throttle differently than most people do. We’re going to do it like a screw driver. So with your hand on that position on the grip, if you’ll just stick your thumb out, and raise and lower your thumb. You’re now rotating your hand around your wrist. If you’re not on a bike, another way you can do it is just [to] reach out and put your arm out in front of you and point at something, while you’re pointing now raise your thumb. And now just raise and lower your thumb, and let you wrist rotate. Just like you do with a screw driver. All of a sudden you can get full throttle. From idle to full throttle with no bend in your wrist whatsoever. But, it requires you to keep your elbow up a little higher. Now eventually, when you get really good at this hand position and this throttle control, then you don’t need to raise your elbow quite as high unless you want to. But the elbow up is the way you’re going to learn it.
Jim: This really takes a lot of the mystery out of everything we’ve heard so far about keeping you elbows up. This completely changes the way that you work the throttle. Also, in my mind, changes the way you control the bike because now you’re not hanging on to that throttle anymore. It just seems to me that you’re just in so much more control.
Coach: Oh, absolutely. [When] you go to YouTube and you look at some of the crash videos, put in for search term ‘whiskey throttle’. You’ll see people that will be standing up on the pegs and they’ll hit a bump or something and get thrown back. And, because they’re hanging on to the grips so hard, as they’re thrown back, they roll the throttle on and they aggravate the situation. It gets worse. The bike now squirts out from under him, and they’re going off the back. So you see, none of that’s about the bike, it’s about your hand on the grip and how you’re connected to the bike. That wild throttle problem is serious. So if you can never ever experience it, that’s a good thing. If all it takes is changing your hand position on the grip, then let’s get it done.
Jim: One of the other things I’ve noticed is, when you see people get on the throttle very hard, they tend to lean down and to the right (to the throttle side) as they’re giving the throttle.
Coach: Yes.
Jim: That’s to get that added twist in the grip to get it to the absolute farthest you can go. You slightly lean that way, and turn down.
Coach: Absolutely. Then it shifts weight to the right side of the bike, and because of the shape of tires, that then turns the bike to the right. Even though all they’re trying to do is whack on the throttle, they’re cranking in a turn at the same time. So when you start looking at crash dynamics, and you slow it down, you can see how a lot of the body mechanics has created the problem. If they could just make a few little changes, then they’d stay upright and keep smiling.
Jim: And we’re going to post a few of the pictures in our show notes that you’ve given us showing this position. The ‘v’ I think is easier to understand probably if you look at the photograph of it, if you haven’t got it just from listening to it from the way we’ve explained it.
Coach: Remember that symmetry on the bike is everything. So even though the throttle’s on the right side, and we’re really talking about right hand position, please mimic what you’re doing on the right, on the left. Try to keep everything symmetrical. Keep everything balanced left and right. It’s not that hard once you get it. This actually turns out to be very comfortable. The other thing that goes along with that hand position, the fingers, is where your lever’s adjusted. Most of the time, people don’t really think about what joints in the fingers the levers are being used. You want the lever between the first and second joint of the fingers so that when you are pulling them in, the lever is fully functional before it comes back to the fingers that are still around the grips. That’s part of the adjustment. Now for plane of control in a seated position, the levers are going to be a little bit higher than when you are in a standing position, with the plane of control going down to the bars a little bit. So what we were talking about earlier is making some lever adjustments. If you don’t want to do lever adjustments on trips, then you split the baby and find the lever adjustment halfway between seated and standing. So it’s not perfect for either one, but it’s a compromise.
Jim: Okay, so we’ve started at our feet, we’ve moved up our legs, we’ve talked about our hips, our back, our shoulders, our arms, our hands…I think now that’s what’s left is our head.
Coach: Well head and neck are really important. A lot of times at the end of the day your neck muscles are sore. Depending where they are sore, we can tell a little bit something about how you’re riding. But one of the things that we need to think about is that there are basically three systems in the human body that help maintain balance. One is called vestibular, and that’s your inner ear. The other is proprioception, knowing where your body is in space and being able to feel pressures. The other is visual. So when you look out at the horizon (you know how we tell you to keep your head and eyes up), if you’re starting to fall, then you’re starting to see a sight pattern that’s not parallel to the horizon. Then that gives you a visual tip. One of the things that we’re interested in in the helmet is, how does the helmet effect your sight pattern? Both foveal vision (which is straight ahead), and peripheral vision (off to the sides)? What are you doing for eye protection? Are you wearing glasses? Do you have a face shield? Are you wearing goggles? How do they effect your vision? The other things is- where are you holding your head with the weight of your helmet on in the slip stream relative to your cervical vertebrae? A lot of times people will lean their head forward and curve their upper spine, and then tilt their head back up so they can see where they’re going. Then they hold that position with the muscles in their neck, which ultimately get over-worked. Especially if you’re in rough terrain. So what we want to do is try to find a little more neutral position that maintains your sight pattern in a way that’s most effective for you and your helmet. The way we do that is we want to bring the head back relative to the spine. Over the years i’ve tried different ways of creating a picture to visualize this, and it’s like; I started out with the turtle. Visualize the turtle pulling it’s head back into it’s shell. Then I tried; well give yourself a double chin. That worked great except in the ladies classes. Finally I figured out that one of the easiest ways to do [this] is, we’ll take a tennis ball and we’ll put it under your chin. You can simulate it by just make a fist with your right hand and holding it there. But can you feel show your head comes back and becomes much more centred over your spine? It takes a little getting used to because most of the time we’re used to hanging our head forward and down. That goes along with just our everyday posture. But once you get this idea of the ball under your chin, then all of a sudden, if you really close your eyes and feel it, you can feel pressure and tension coming off some of your neck muscles. It’s easier to keep your head in that position, especially with the weight of your helmet. Then when you get into some high speed situations where you’ve got a parasitic drag, you’ve got the wind flow in your face, you’re much more efficient in using your muscles to counteract that wind force. Now all of these things together make your ride easier so that you can be better longer. But you have to take the time to build this foot pegs up posture. Just one little thing at a time. The beauty of it is though, we’re all riding, and there are times when we’re not doing much. Maybe we’re just going down the highway. Well what a beautiful time to just do a little assessment. I mean, you’re not doing anything else. So- foot pegs up. Work your way up. Or sometimes if you’re off-road, maybe there’s a nice flat stretch of dirt road or gravel road where you’re not in the rough, and you’re not doing whoops. While you’re on the gravel road, do an assessment. Just constantly remind yourself. Then if you are tired because you’re using a new posture or whatever, just go back to your old way and relax a little bit. But then come back to it as you can. You’ll find that as you get stronger and stronger, you don’t need to come back to it as often. Pretty soon it becomes your new riding posture. It just becomes normal for you. So you build your training program from the foot pegs up into your everyday riding situations. And that’s pretty much how we do it.
Jim: Well Ramey, thank you very much. And next time we talk, we’re going to be talking about looking for traction. So I look forward to that.
Coach: Yeah, that ones going to be fun. It’ll take body mechanics into actually what we’re doing by moving around on the bike and how that’s going to effect our ability to accelerate, to brake, to be able to turn, to do hills…all that kind of stuff that just drives us crazy because it’s so much fun.
Jim (Narrate): I’ve been speaking with Coach Ramey Stroud, from his training facility in Oregon. You can find out more about the Coach and what he does at his website www.ridecoach.com
~END~
CREDITS:
Interviewer/Host: Jim Martin
Producer: Elizabeth Martin
Transcriptionist: Natasha Martin
*Special thanks to our guest: Coach Ramey Stroud www.ridecoach.com
Music:
"Not So Awesome Tune" by Admiral Bob
2017 - Licensed under Creative Commons Attribution (3.0)
http://ccmixter.org/people/admiralbob77 Changes Made
Blind Love Dub by Jeris (c) copyright 2017 Licensed under a Creative Commons Attribution (3.0) license. http://dig.ccmixter.org/files/VJ_Memes/55416 Ft: Kara Square (mindmapthat) Changes Made